Showing posts with label Do It Yourself Projects. Show all posts

August 12, 2013

Starting Over--A New Fire Pit!

It was once a sand box, then when the kids quit using it, it became a fire pit.  Seems like so long ago that those littles were in their building sand castles.  But we've also had many memories gathered around the fire pit.  It was ready for an upgrade.


I ripped out all the timbers that made the frame.  It came out much easier than I expected and I was pleasantly surprised.


After shoveling out lots of ash and extra sand, I began circling the bricks and leveling them. (not my favorite part of the project!)


I used some landscaping cement to anchor all the bricks to each other to make it sturdy.


That was a big task, but we are only half way done!  Then came my favorite part....shopping and finding some really cool rock for the fire pit.


After placing the rocks around the exterior of the bricks, I filled in the areas between bricks with sand.

Are you ready?  It took me several trips back for rocks, as I had a picture in my mind of how I wanted it to look.  I am really pleased with the result.


We've already had our inaugural fire to roast marshmallows!  What do you think?

July 17, 2013

Bathroom Redecorate

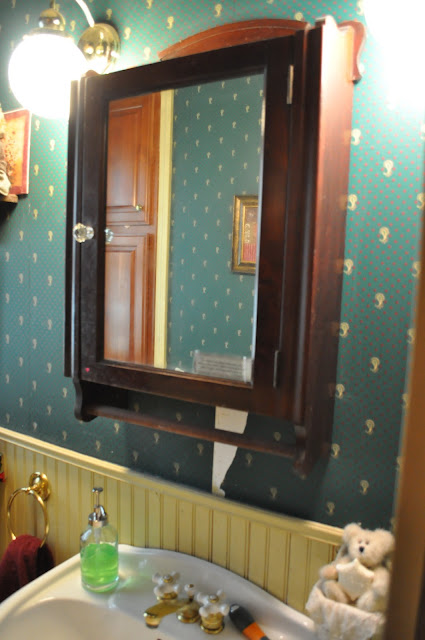
We have lived in this house for 14 years now.  Somehow with all of the other projects that have had to happen around here, this downstairs bathroom never got redecorated.  And oh boy, did it need it.  Take a look at this wallpaper!


See my supplies there ready to strip?  The first hour went very slowly, but after getting more spray on the walls and asking for a little help :) (my kids thought it was fun!) we got it knocked out in a day!


Ugh, right?  With that yellow bead board!  The final straw that put this project at the top of the to-do list was the sink.


It had a crack in it for several years, but this summer it finally caved in.  Well, plus the fact that bathrooms are so pricey to remodel!

Are you ready to see the finished product?  We are so very excited!


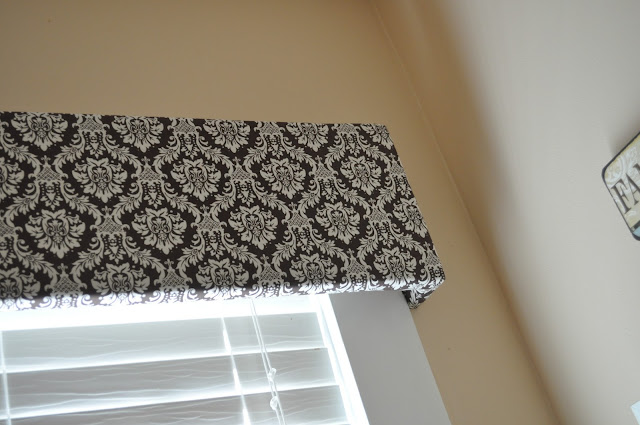
The paint is a light sand color on top, with chocolate brown on the bottom.  The blinds are new faux wood, with a homemade cornice that hubby made for me (so easy!).  I simply wrapped it in a layer of fleece and fabric, attached with my staple gun.


Turquoise blue is one of my FaVoRiTe colors, so I incorporated it into the decor.  It will be an easy color to switch out if I would like.


I printed the frame and butterfly on a  page out of a hymnal I had purchased at the library book sale.  The frames are from IKEA. (Who does't love that place?)


My sand and shells are from our vacation over Spring Break to the Gulf Shores.  A perfect addition to my sand wall color!


It is a tiny little bathroom, so our working quarters were very tight.  Usually only one person could work at a time!


I love the new sink cabinet that gives us a little storage underneath, unlike our previous pedestal sink.


I may be most excited about the new floor.  Although just vinyl, it  looks like real wood that matches the dark wood trim throughout our old house.  Added bonus?  We did ALL of the work ourselves.  I am so thankful for a talented husband!


Man, it is such a relief to have THAT project done!!!

November 26, 2012

Pallet Bed with Trundle

What seems like years ago was actually only a few short months ago....summer!  I don't believe I ever shared with you the trundle bed we made for our junior high daughter out of pallets.  It was a lot of work, but it really turned out great.


K loves having friends over, so we wanted to make it far enough off of the ground so that a trundle would fit underneath.  Plus she wanted some place for storage, and we were lucky enough to find these cute zebra bins in the perfect colors that match her room.  (She is a little zebra crazy!)  We found some freebie luggage tags that we spray painted with chalkboard paint so she could label her bins.

But after we incorporated the trundle and the storage space, we realized that it was REALLY far off the ground, so we (by we I mean Husband) built some cool stairs for her to climb into bed.  He even hid her dirty clothes basket within one of the steps!


It was a lot of work tearing apart many of the pallets, but we are really happy with how it turned out.  A note to anyone wanting to build with pallets....it takes a LOT of patience!  You'll find that pallets come in all shapes and sizes so creating a large project can be tricky.  We were very fortunate to find a business nearby that actually encourages people to come use their pallets, and they were free!

We still have lots of pallets left.  What can we make now........?


April 19, 2012

Spray Paint to the Rescue.....Again! It's All Over My Front Porch!

When you live on a tight budget, you can't just run out and buy new when a few things start to look a little old and tattered.  So of course, my first go to is always spray paint.

My wicker bench on the front porch has been around for more years than I can count.  Two dogs have taken their tole, claiming it as their lounge.  It needed some sprucing up!


I also have a high cafe table out on the porch that is black.  I really wanted to bring some cohesion to the porch, so I decided to paint that white as well.  Oh that side table?  Yep, it's getting a coat too! (never mind those kids playing four square in the background!)


Ready to see how it all turned out?  Squee, I am so excited to show you!!!


In the summer time, my table and chairs is a great little place for morning devotions and quiet.  I love the early morning light.


The wicker bench could probably use one more coat of paint because that wicker was so dry it just soaked it all up.  At the time, rain was coming, so I had to finish quickly!  A project for another sunny day.


And here it is all together.  A perfect little spot for company, don't you think?  When are you coming over for a visit?

June 22, 2011

Adding a Water Feature to Your Garden

Water features have become more and more popular in the garden.  You no longer have to dig a pond to have the calming effects of running water in your yard.  I set out to explore the many selections at Niepagen's Greenhouses:


Ann sent me home with a great fountain to put together and show you!  I couldn't believe how fast and easy it was to put together.  This is the site I chose, which I knew would be perfect.  It is right next to our patio where there is just a small space between the patio and fence to our back yard.

Of course, my first course of action was to dig a hole that the basin sits down into.  This is so the fountain can sit flush with the ground.  It is very important that this piece be level!
Your kit will include the fountain piece, which is made of lightweight resin, the pump and tubing, basin and lid.
After your basin is level, you'll set the pump in the bottom and then run the cord out through the hole in the top of the base.  (You'll need to be sure your fountain is near electricity!)

Now this is the only tricky part!  The tubing then needs to be set on top of the pump and then thread through the middle hole in the shelf.  Tricky because sometimes it wants to pop off the pump top and can be a little frustrating!
Now I have the pump set in the DRY basin, and my tubing sticking through the hole in the shelf.
The tubing will most certainly be longer than you need, so you'll need to put it up through your fountain, then mark with a sharpie where to cut it.  BE SURE you don't cut it too short.  You can always cut more off a second time!
This second piece of tubing pushes onto the long section.  It is a firm fit, so don't be afraid to really push it on there so it doesn't leak.

Now here is a manufacturing problem that drives me crazy.  The hole is too big for the tubing.  If not plugged, the water all runs down the center instead of over the edges where it is intended.  This sends me on a trip to my husband's plumbing tool box for some putty!


This stuff is like playdoh and is very soft and pliable.  I simply rolled out a snake to wrap around the tube to seal the extra spaces around it.

Problem solved!
This cute little door is a great place to be able to put your hand through the top if the hose pops off the pump! You will also eventually needs to clean off the pump from debris, so this is where you can get to it.
Our progress so far shows the fountain sitting on the shelf.  Now we can spread rock across the top of the shelf.  The kit came with some black slate rock, but I decided to find my own colors that I liked better.  I found this box of polished rock at a garage sale!
So simply spread your rock over the shelf, add water to the basin with your hose, and your fountain is complete! It took me under an hour to dig the hole and complete the kit!

 
It is so pretty and creates a beautiful sound of running water near our patio and gazebo where we can enjoy it!

LinkWithin

Related Posts Plugin for WordPress, Blogger...